Testing the 3D Printing Waters - Chuck Box
Motivation
I’ve started spending more time family camping than solo backpacking and this has necessitated a change in the way I do things. A cat-food container alcohol stove and ziplock bag of dehydrated BBQ spaghetti weren’t going to cut it anymore. Also, starting a fire, burning it down to coals, heating a pan, and cooking dinner turned out to be a little too time consuming for my fresh-from-the-playground toddlers. I decided I needed a family camp cooking kit.
I was a little jealous of my friend Greg’s kit as he turned a knob, flicked lighter, and made coffee in mere minutes. I also realized that this project would be a perfect opportunity to improve my 3D printing skills. So with the power of craigslist, the contents of my garage, a spool of PLA, and access to a MakerBot Replicator 2, I set out to make a chuck box.
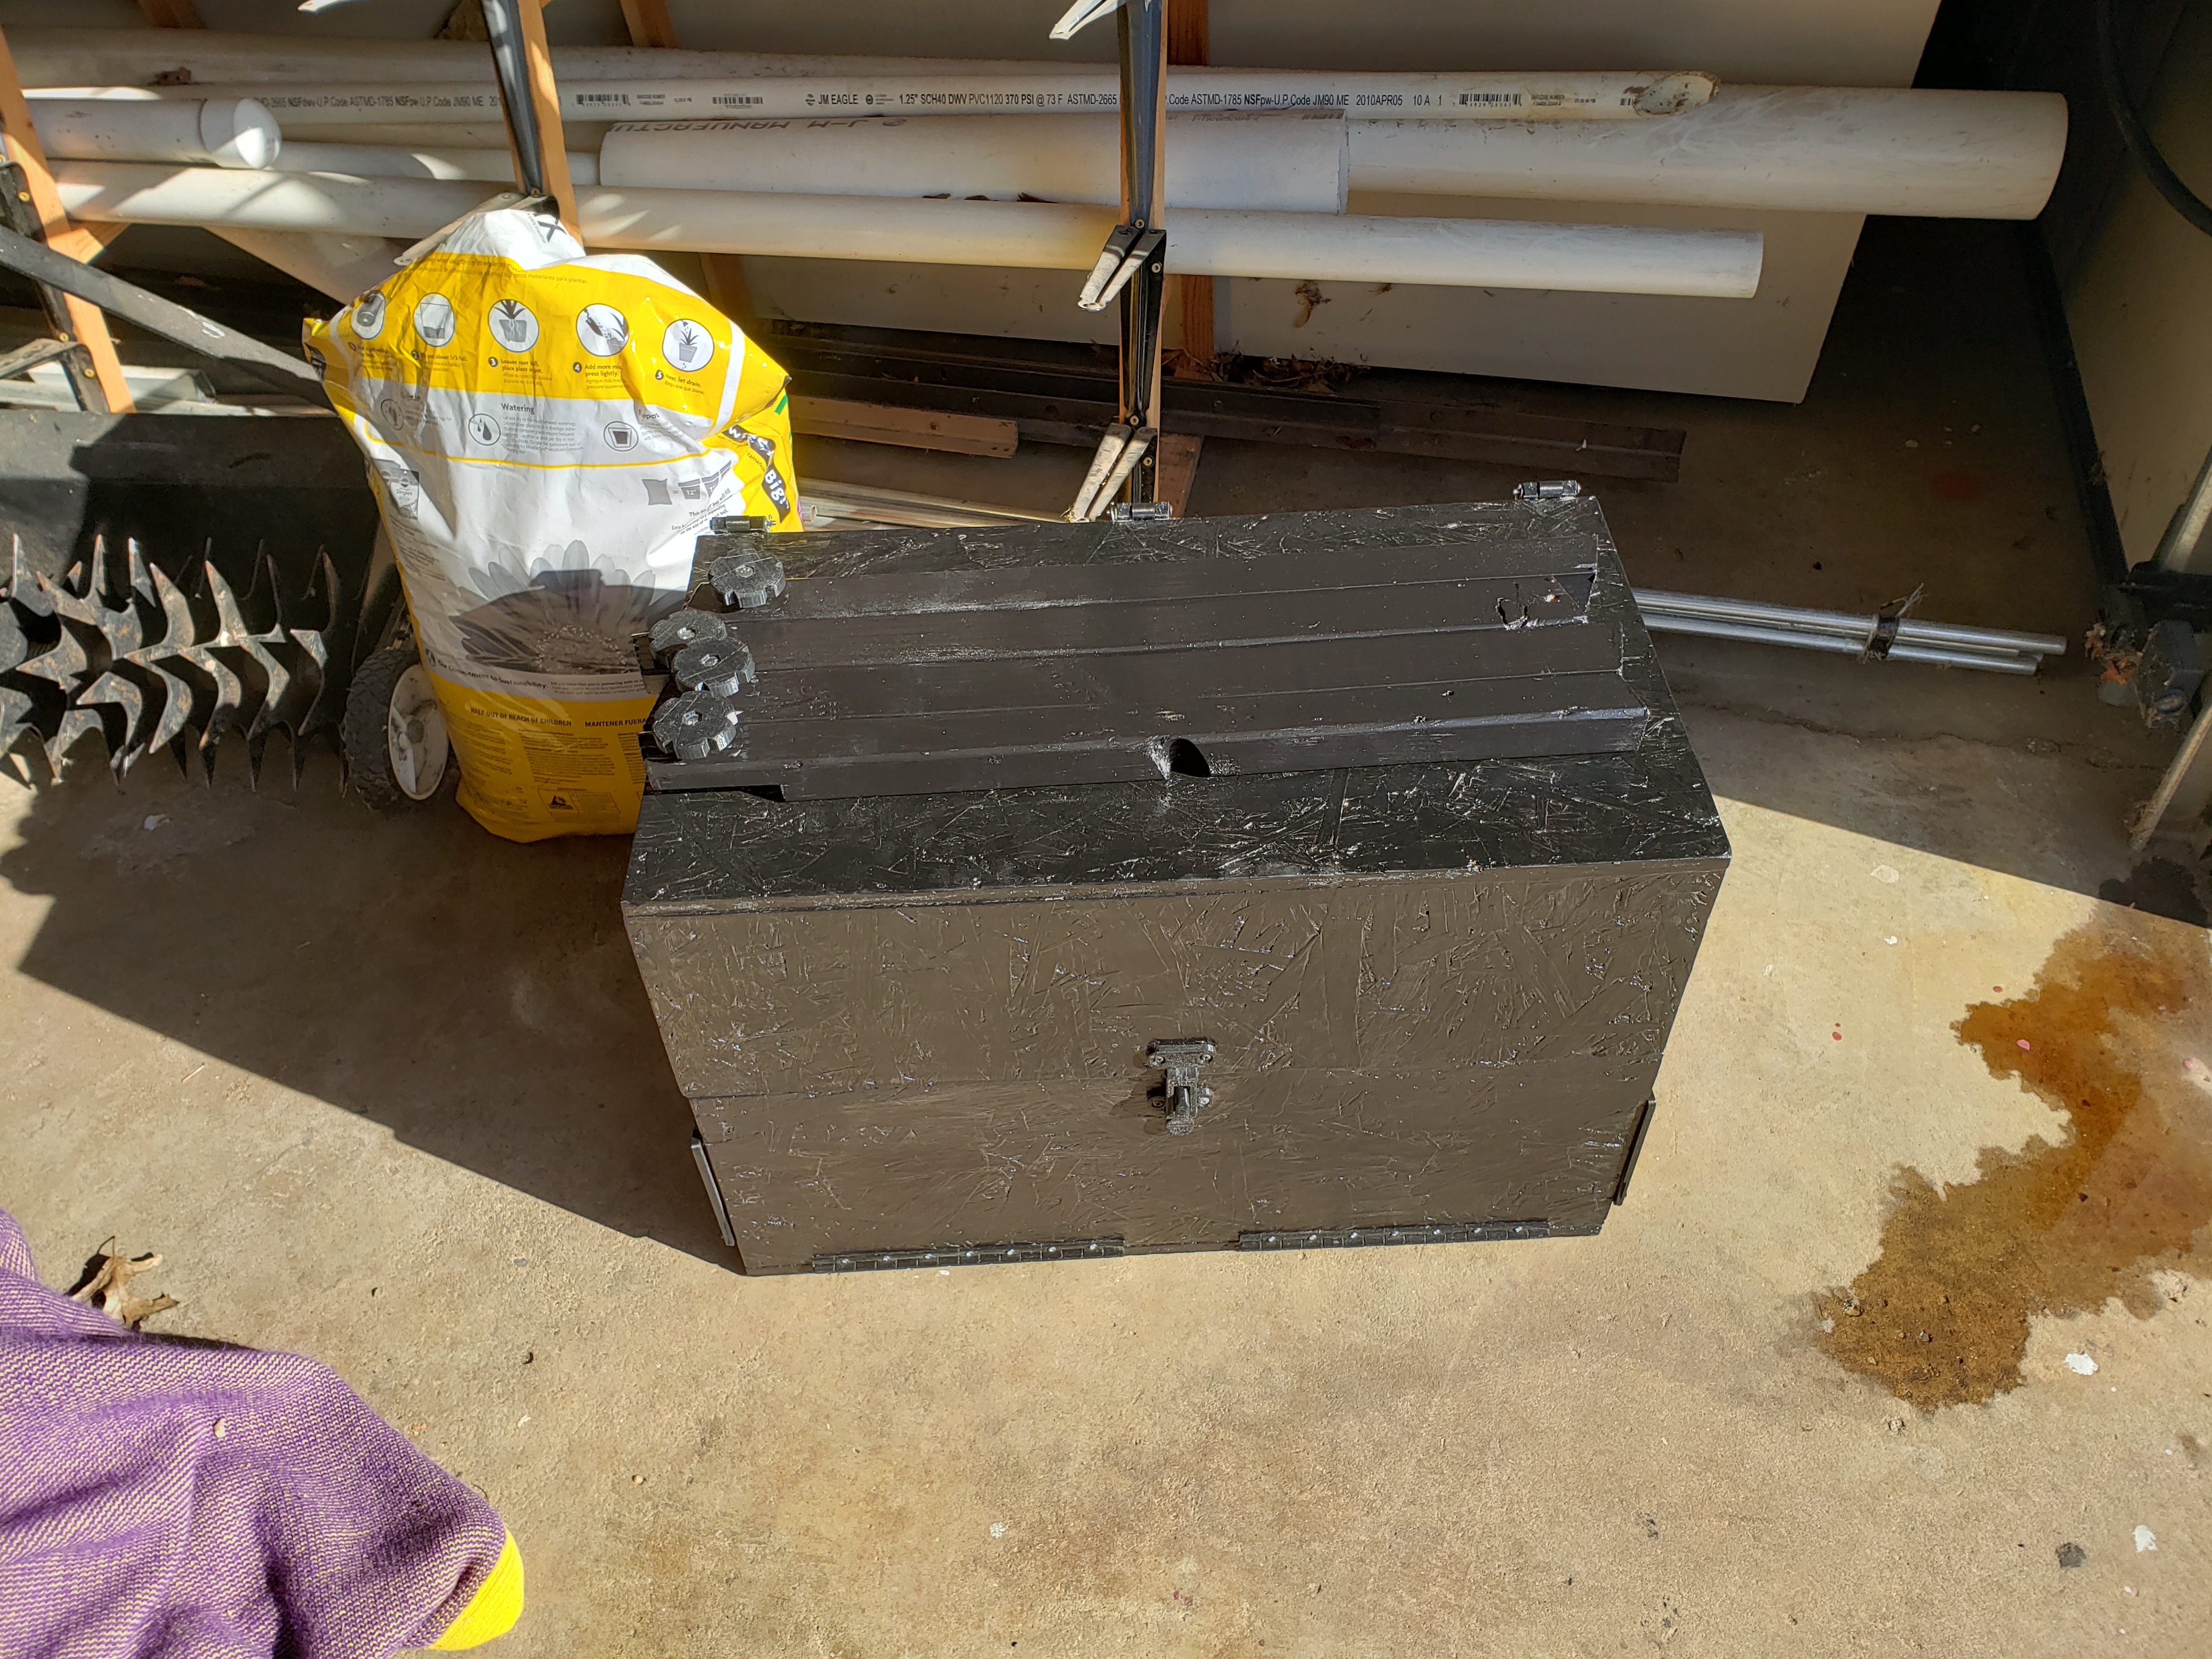
Finished Product First
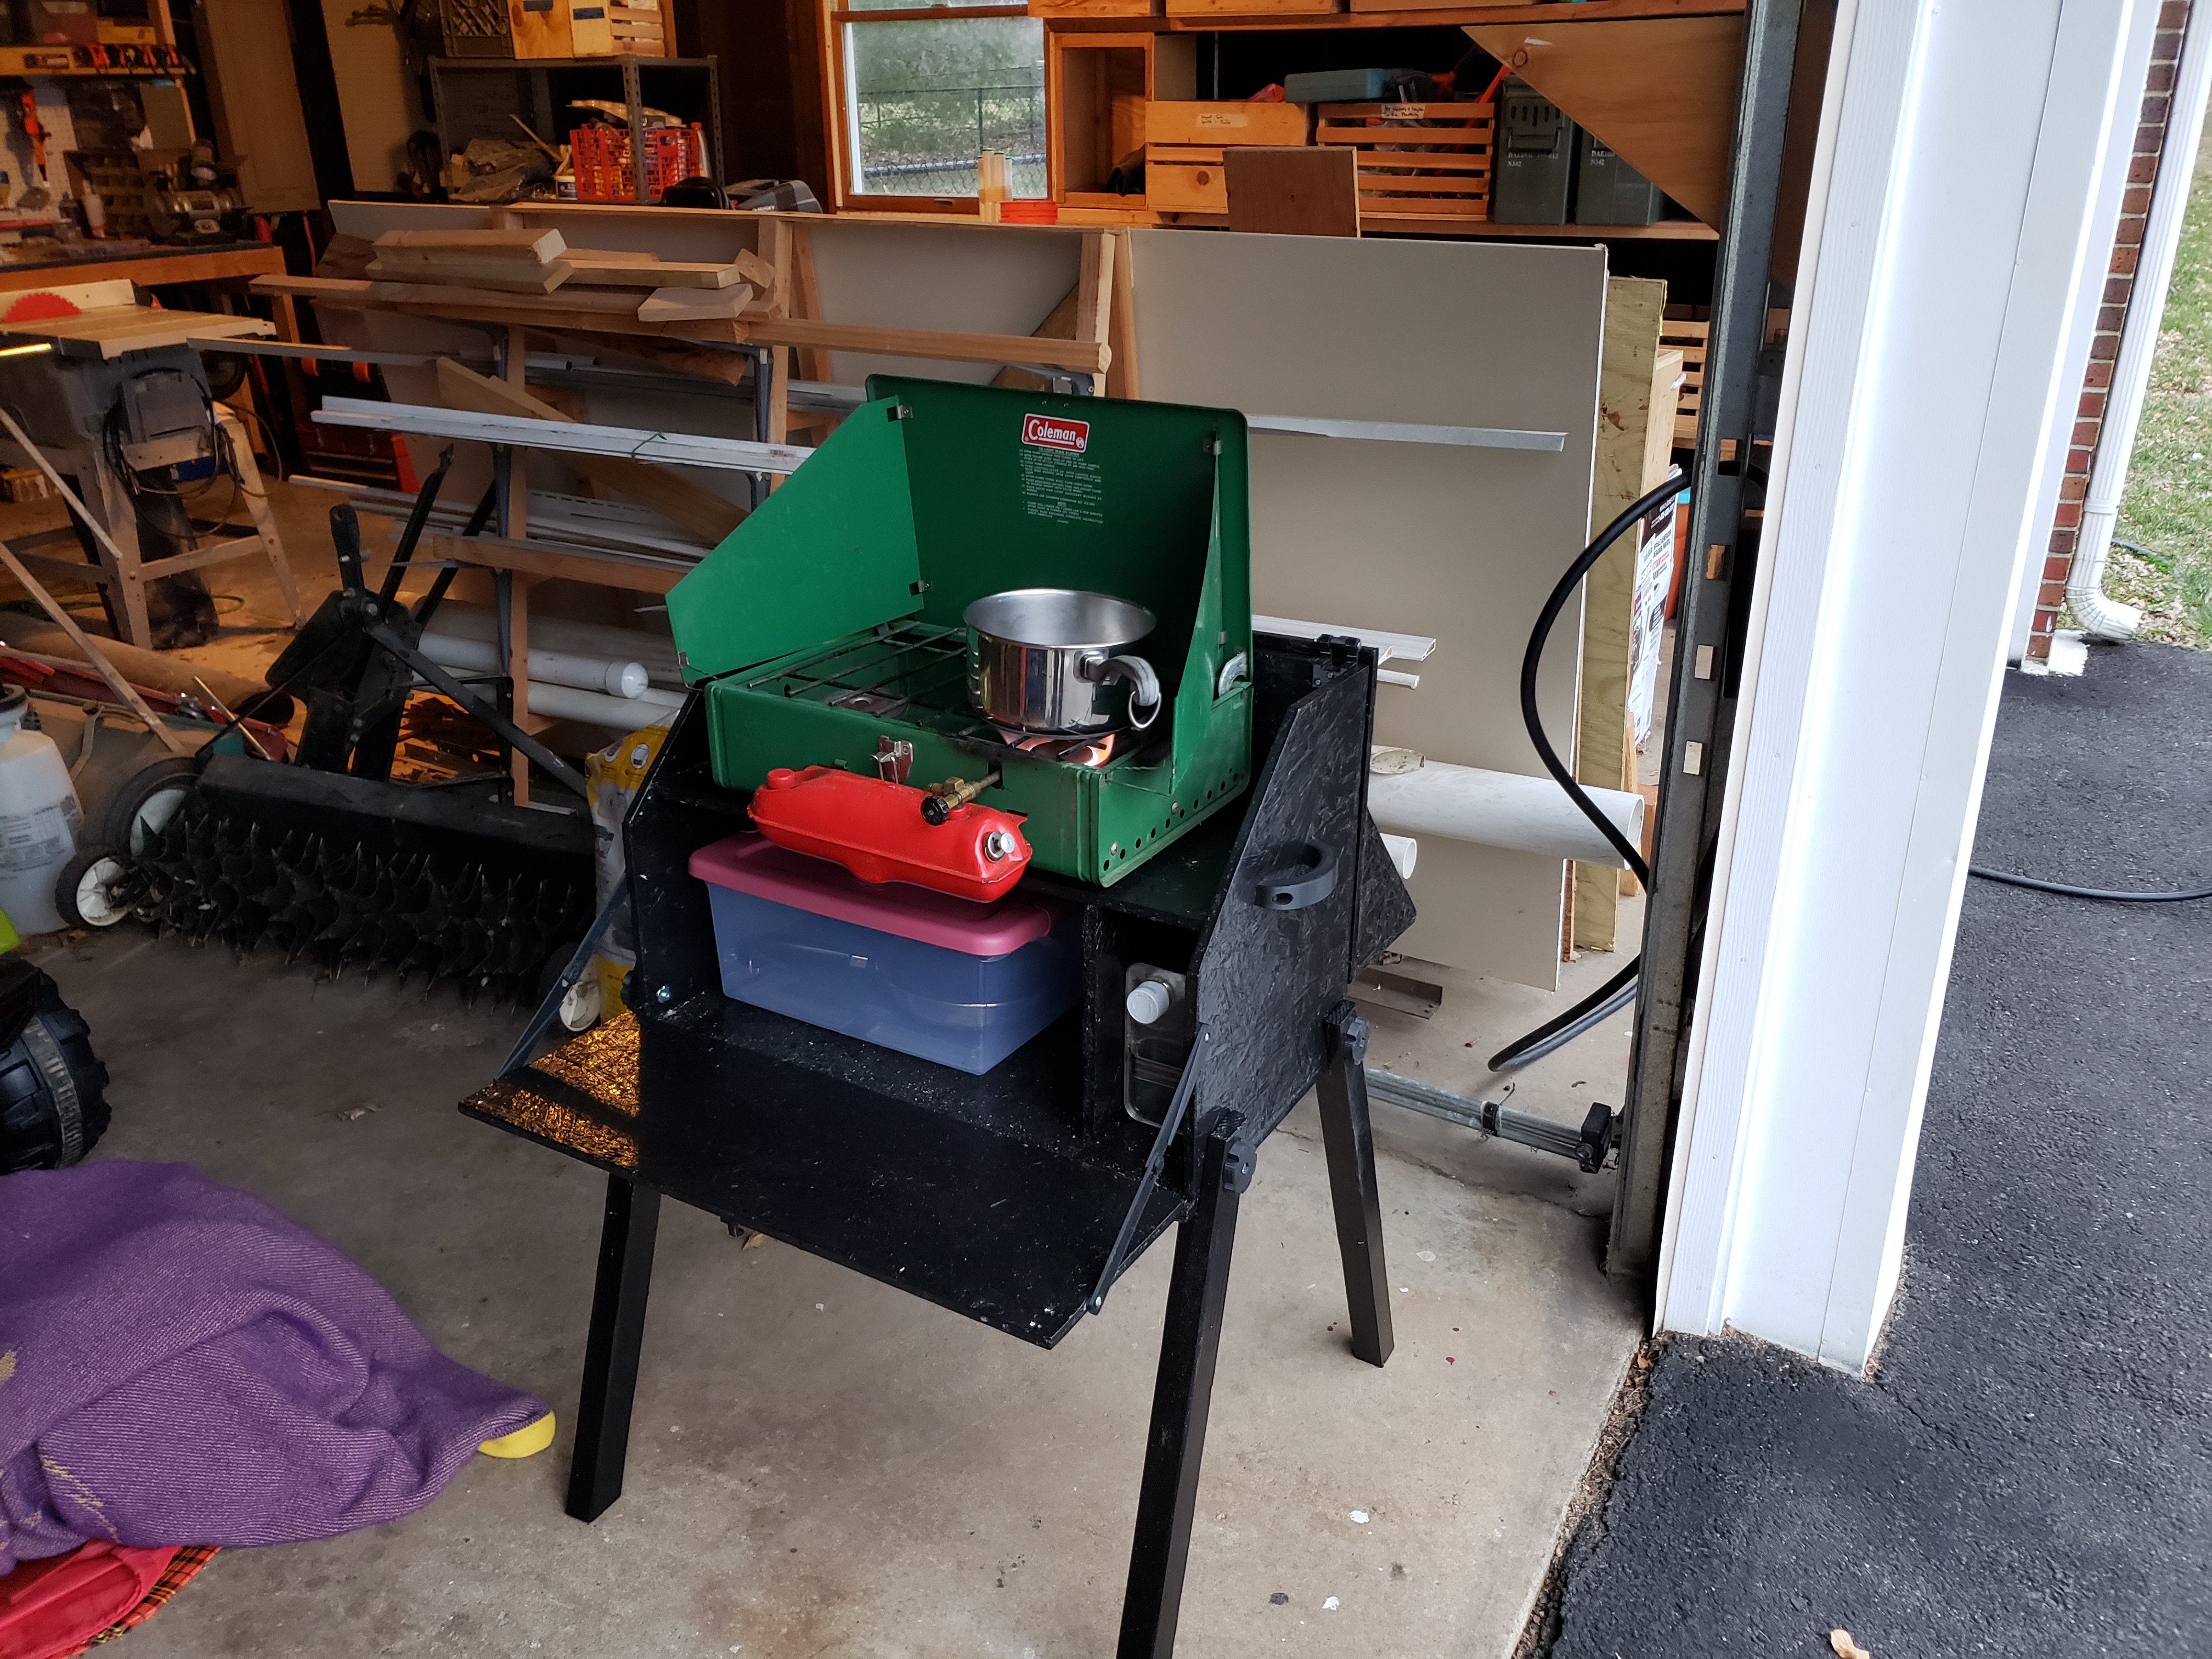
Packed Up
Open and Cooking
The Stove(s)
From the start, my heart was set on the venerable Coleman 425. You’ll need a stove that can run on gasoline when you’re refueling at the bombed-out Shell station in between waves of mutant zombie attacks. I mean, it’s obvious.
That being said, the convenience of a propane no-pump, no-preheat instant flame is nice too. Luckily for me I found someone on craigslist selling both and they already came pre-seasoned with some camp stickers.
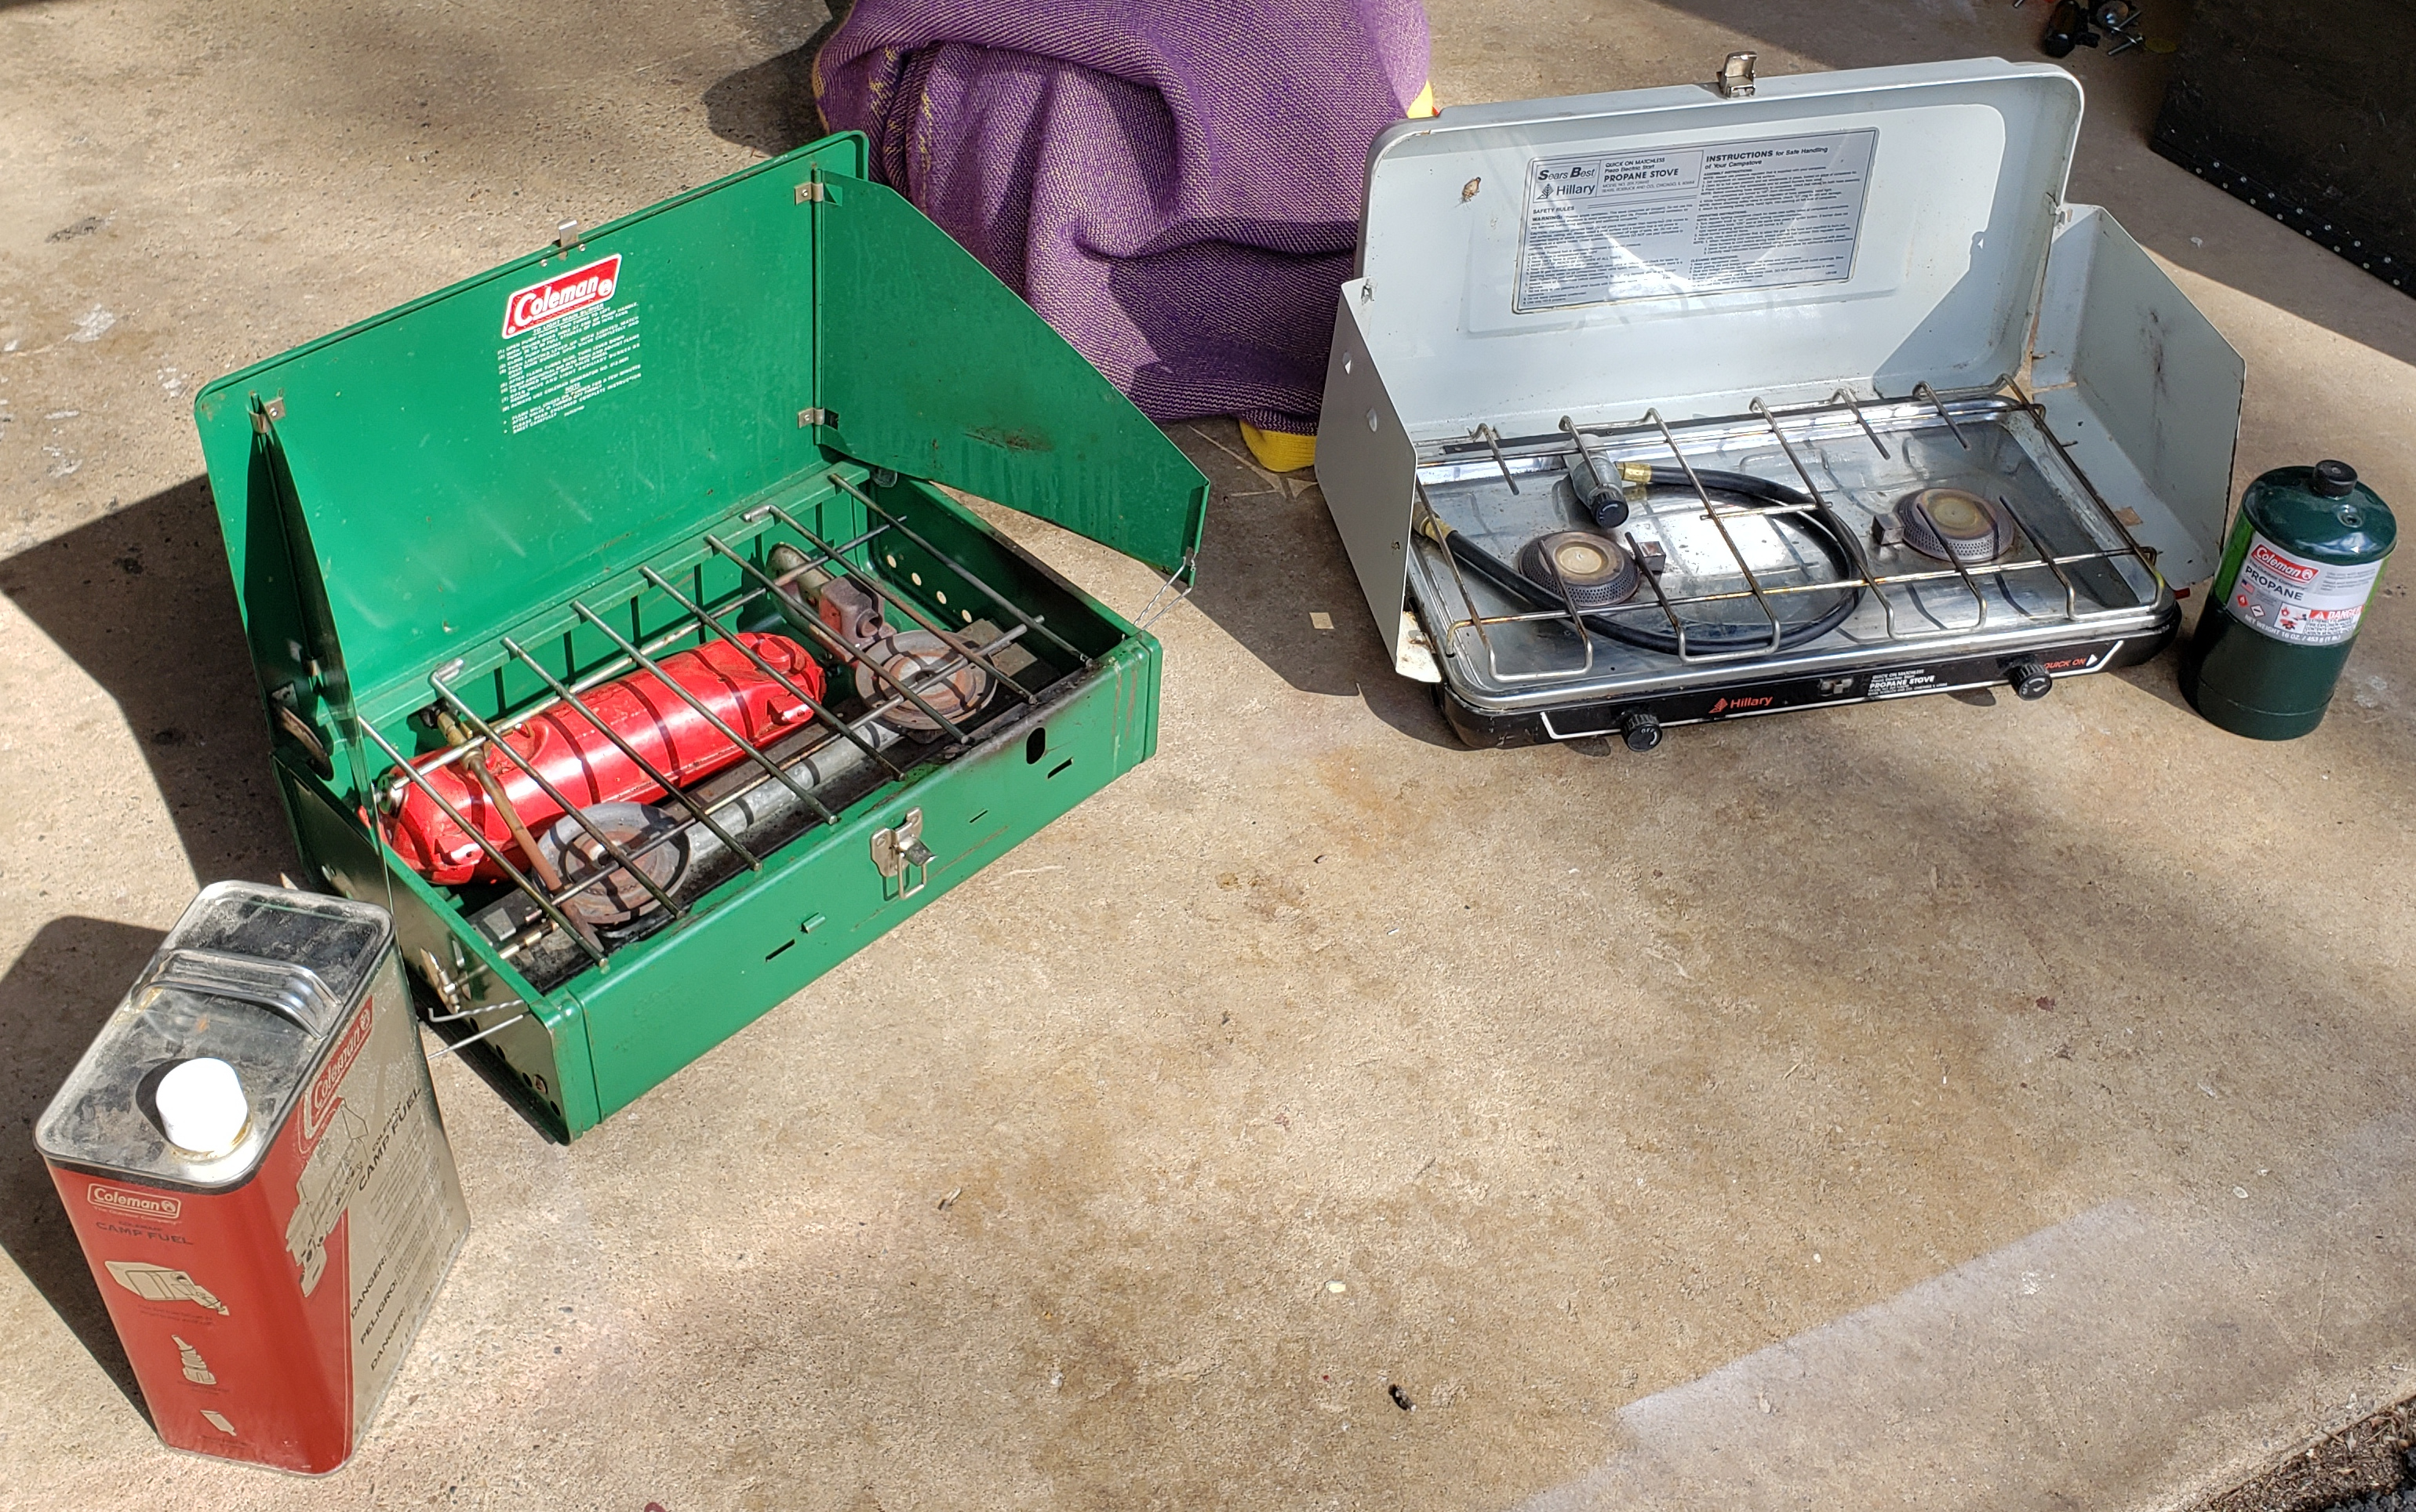
I decided to design my chuck box to fit either, which meant making it slightly longer so the propane canister could fit on the side.
The Box
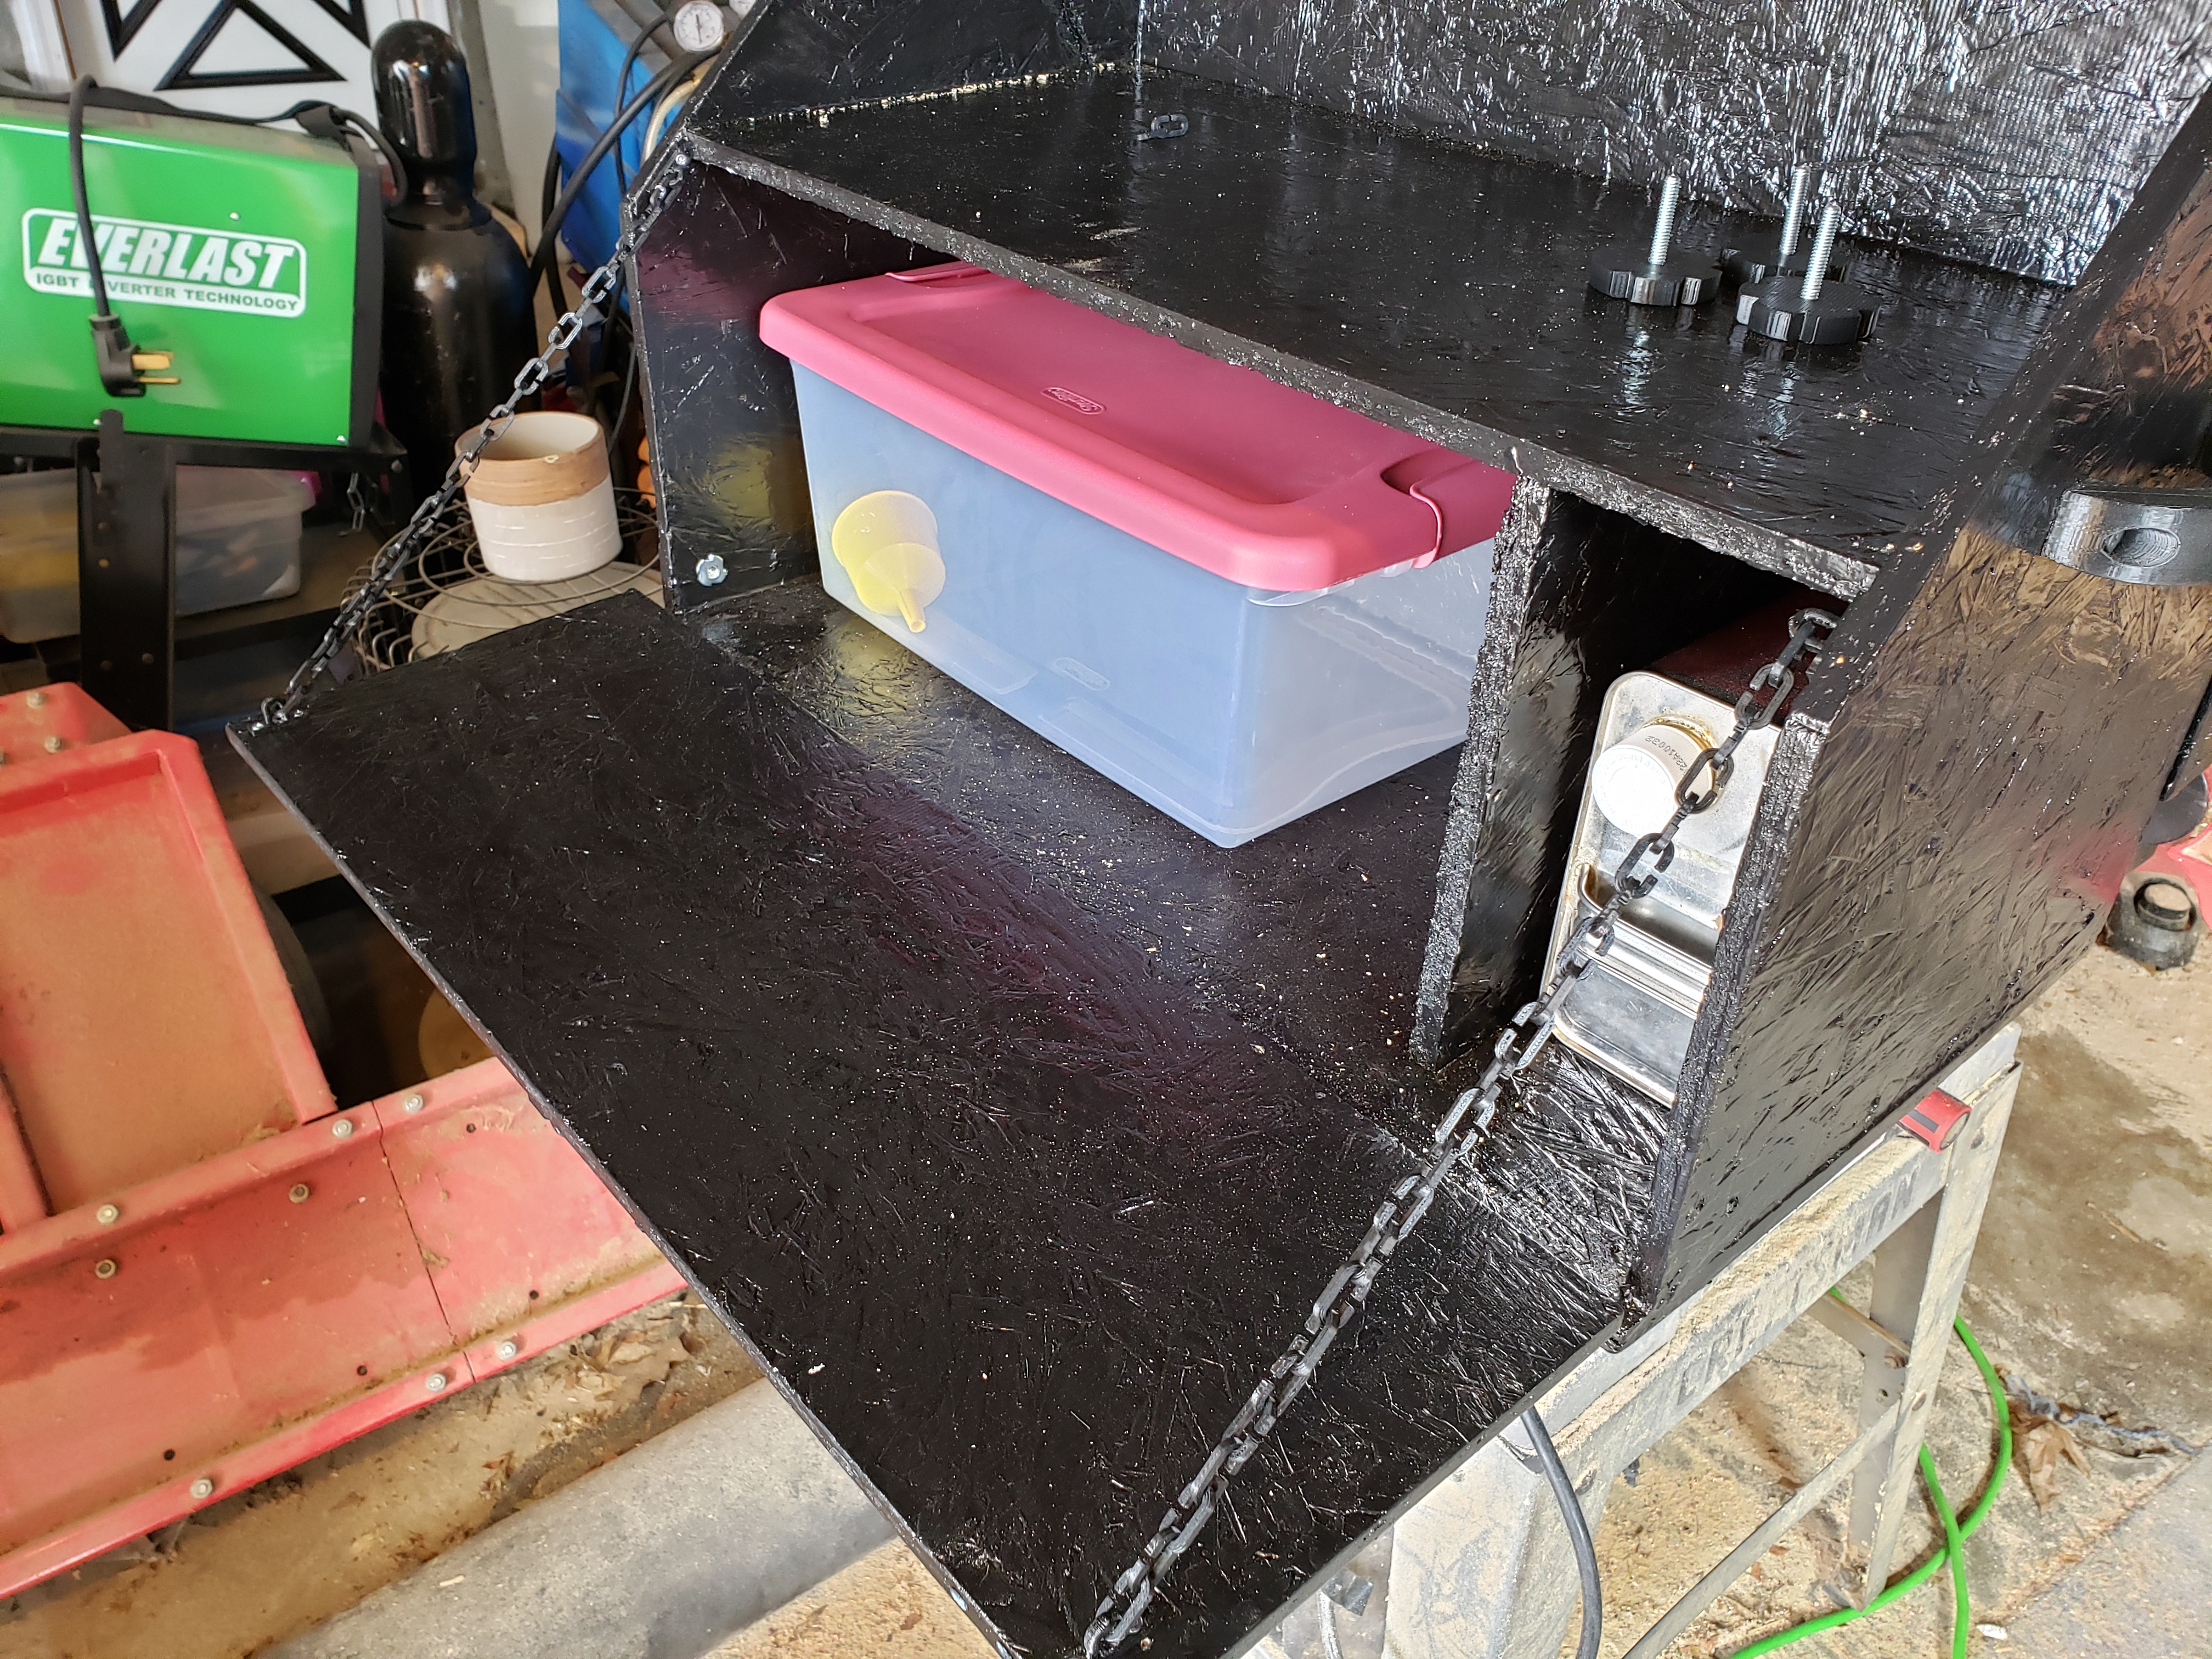
The box itself is made of leftover OSB from a shed, 1/4" crown staples, liquid nails adhesive, and glossy black paint. The box has one top compartment for a stove and two large bottom compartments for fuel / supplies. I didn’t divide it further because I wanted to carry a large storage bin that could also be used as a kitchen sink.
The Hardware
After looking at my options for a top hinge, I decided that I would try to 3D print as much of the hardware as possible. The top hinge was exotic enough to warrant it and the other parts would be good practice.
Handle1
I started designing this part in Tinkercad but ran into issues when I wanted to chamfer an edge (nobody likes a handle digging into their skin). After a little reading I decided to learn Fusion 360 and quickly turned out a part (STL).
The software that was distributed with the Replicator 2 that I was using was MakerBot Desktop and that is what I started with. I was hoping I would be able to use the newer MakerBot Print at some point, but it turns out that this printer is very incompatible with much anything else. The more I dug into it, the more I realized it would be a pain to make this printer work with any open source slicers I may want to try. Not impossible but definitely not easy. What had happened to the great “open manufacturing” promise of the RepRap?
Proprietary software nonsense aside, I managed to get two 50% infill PLA handles designed and printed. They peeled off the bed a bit, but I didn’t know much about bed adhesion at this point.
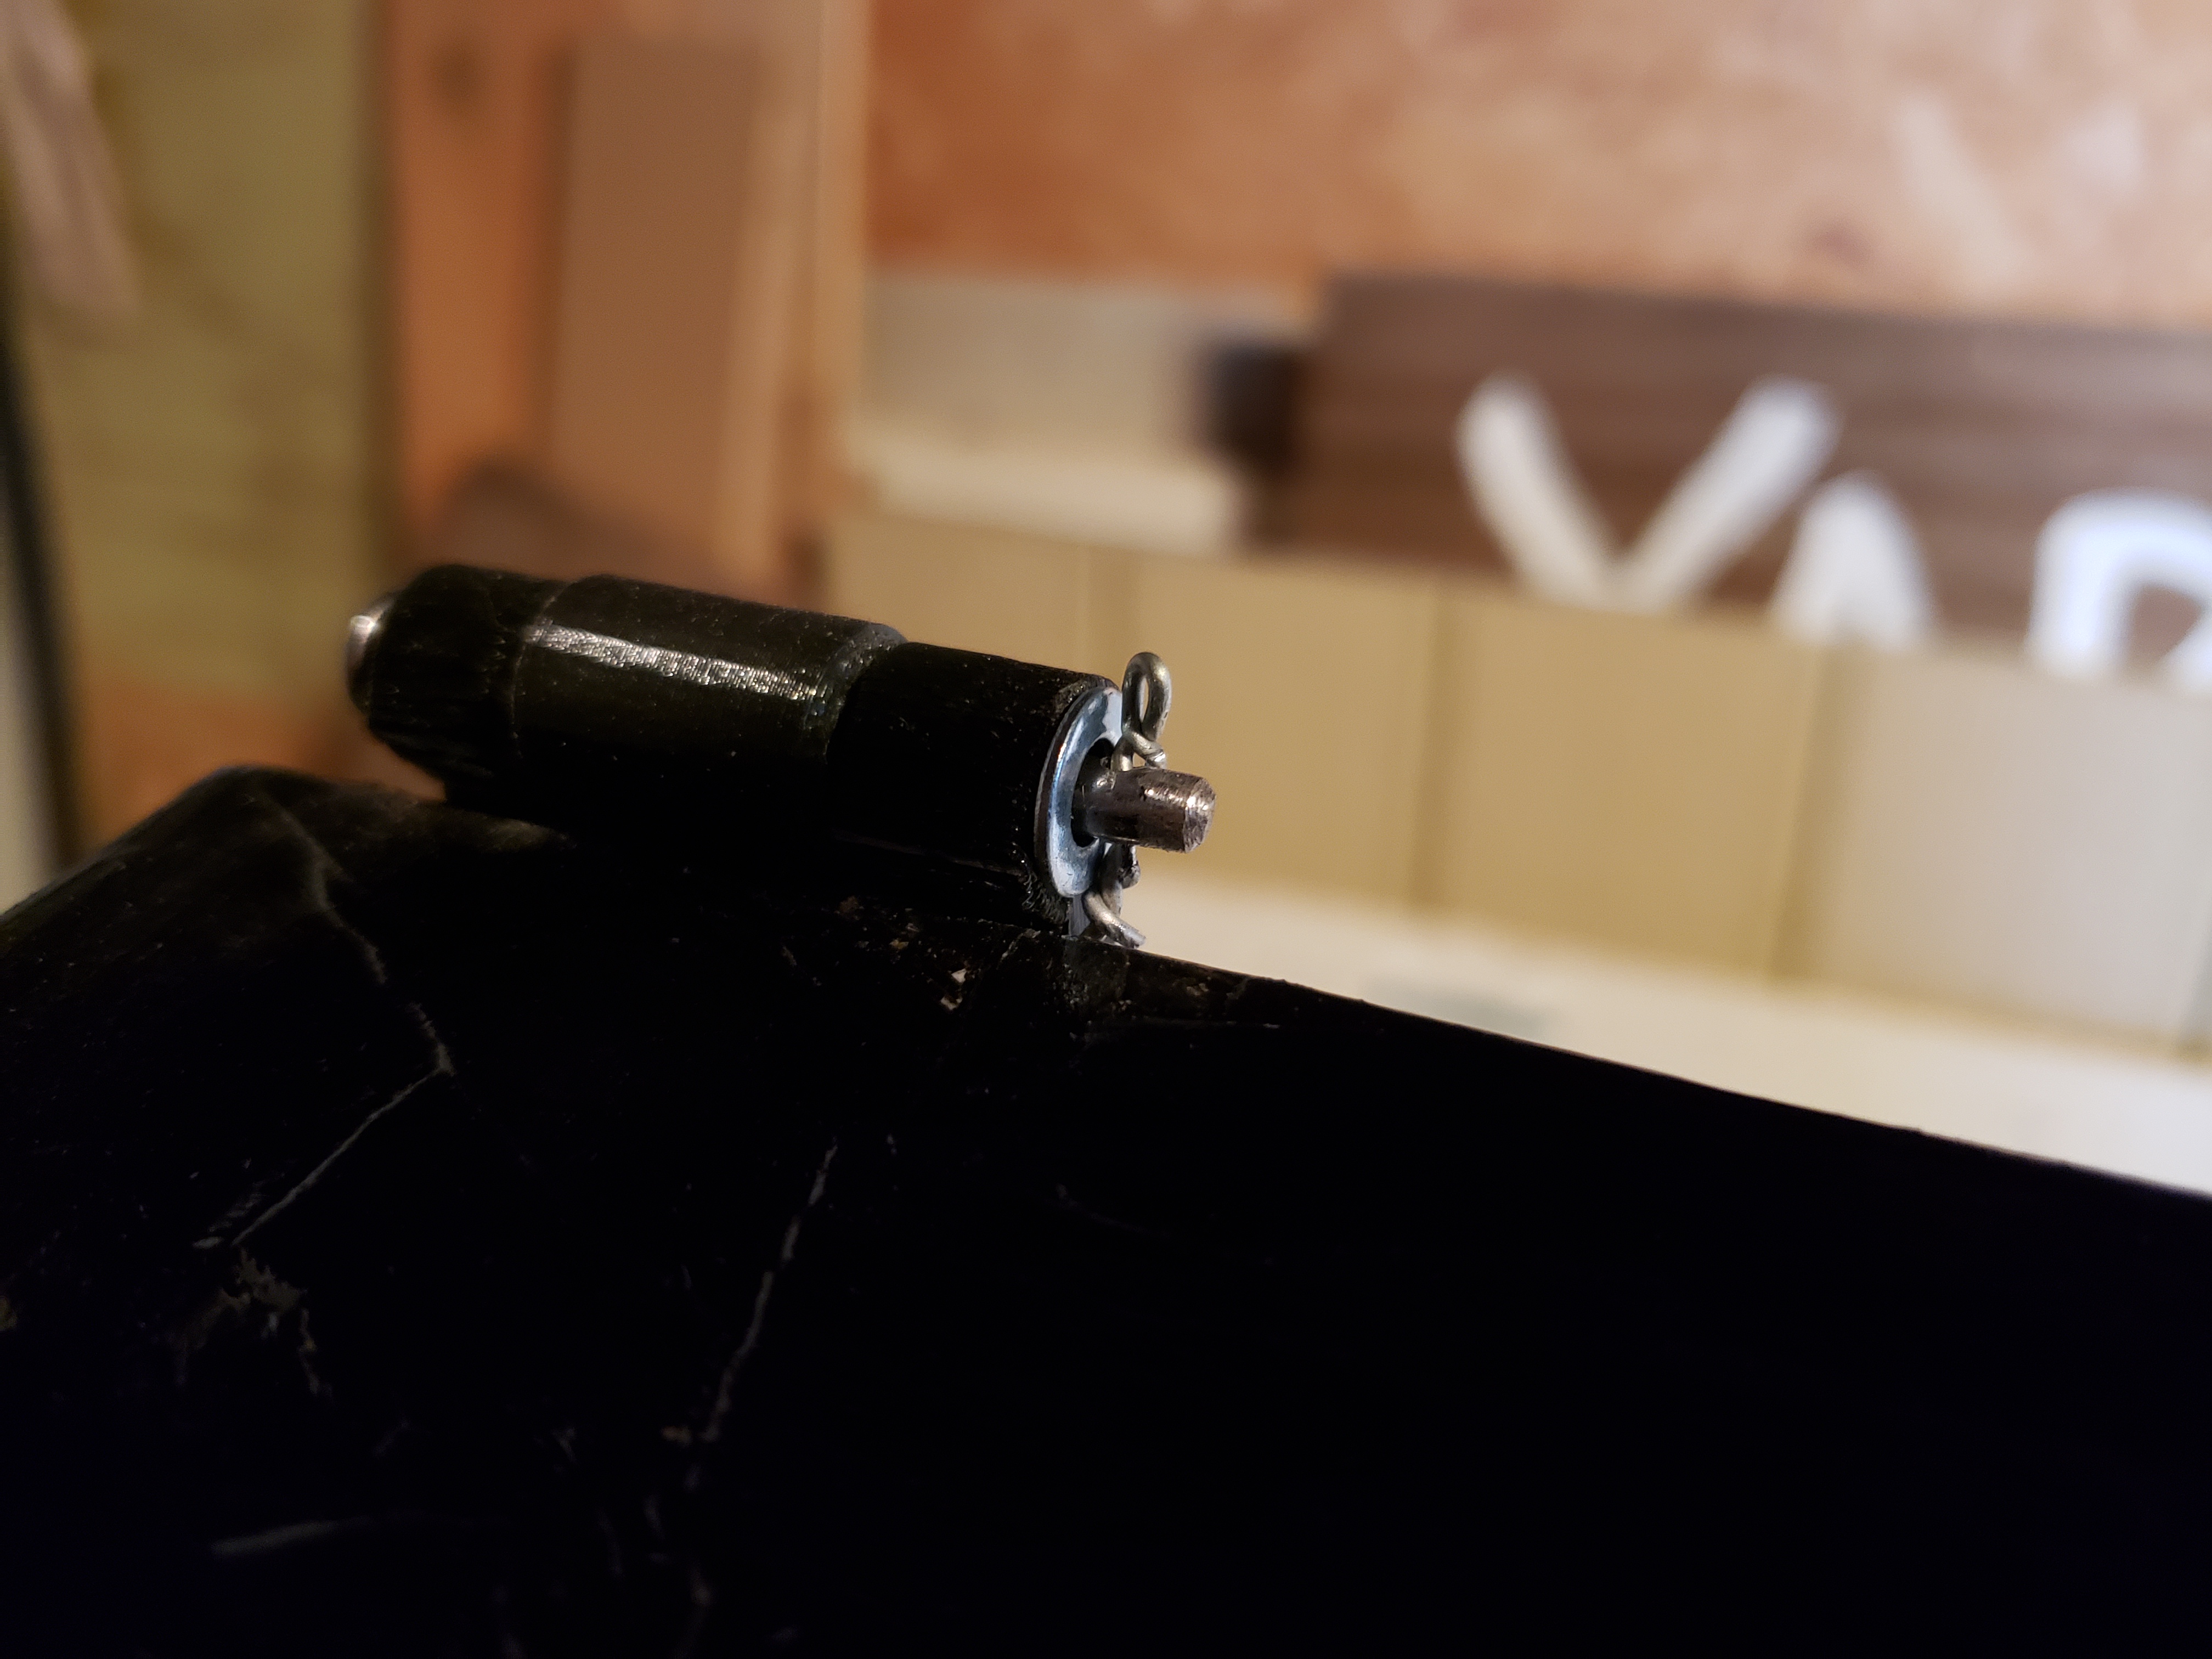
Top Hinge
This was the first major part I designed entirely in Fusion 360 ( f3d, STL). It was also the reason for trying out 3D printing in the first place. I needed a hinge that supported opening the top 270° so it would be out of the way of the stove. This has the added bonus of making a little shelf on the other side of the chuck box when you open it.
It was supposed to be a print-in-place hinge, but I couldn’t get the printer to bridge the distance the pin needed, so I chose to design a push-in pin for it (pictured but ultimately not used). The supports generated by MakerBot Desktop wouldn’t work either so I designed and added break-off supports which also required bridging but worked well (go figure).
The amount of play in my woodworking meant that a tight-fitting hinge pin was not going to work. For a while I utilized bolts which barely fit and put a lot of strain on the joint. One day in a 32℉ garage I learned what people meant when they say PLA is brittle. The side of one of my hinges broke off and hit the garage door.
Eventually I ended up drilling a 1/16" hole in the end of a nail, cutting it to length, and using a washer and wire to keep it from falling out. I would not recommend this technique.
Bottom Hinge
For the fold down platform I would typically use a long piano hinge, so I looked to Thingiverse to see what had been done before. Fortunately there was a great parametric piano hinge available. I was yearning for some print-in-place goodness and wanted to try OpenSCAD as well.
I generated the longest hinge that the Replicator 2 could do and ran smack into leveling and bed adhesion problems. I cleaned the bed, put down a layer of blue tape, and leveled it. Adhesion improved greatly and I was able to make a long hinge. Unfortunately the print tolerances were too poor for the hinge to be able to move.
I made some modifications including a less thick pin and a larger gap between the moving parts. The file can be found here, but it should be noted that I don’t think my variables are fully “parameterized”. I just changed the values in OpenSCAD and regenerated the STL.
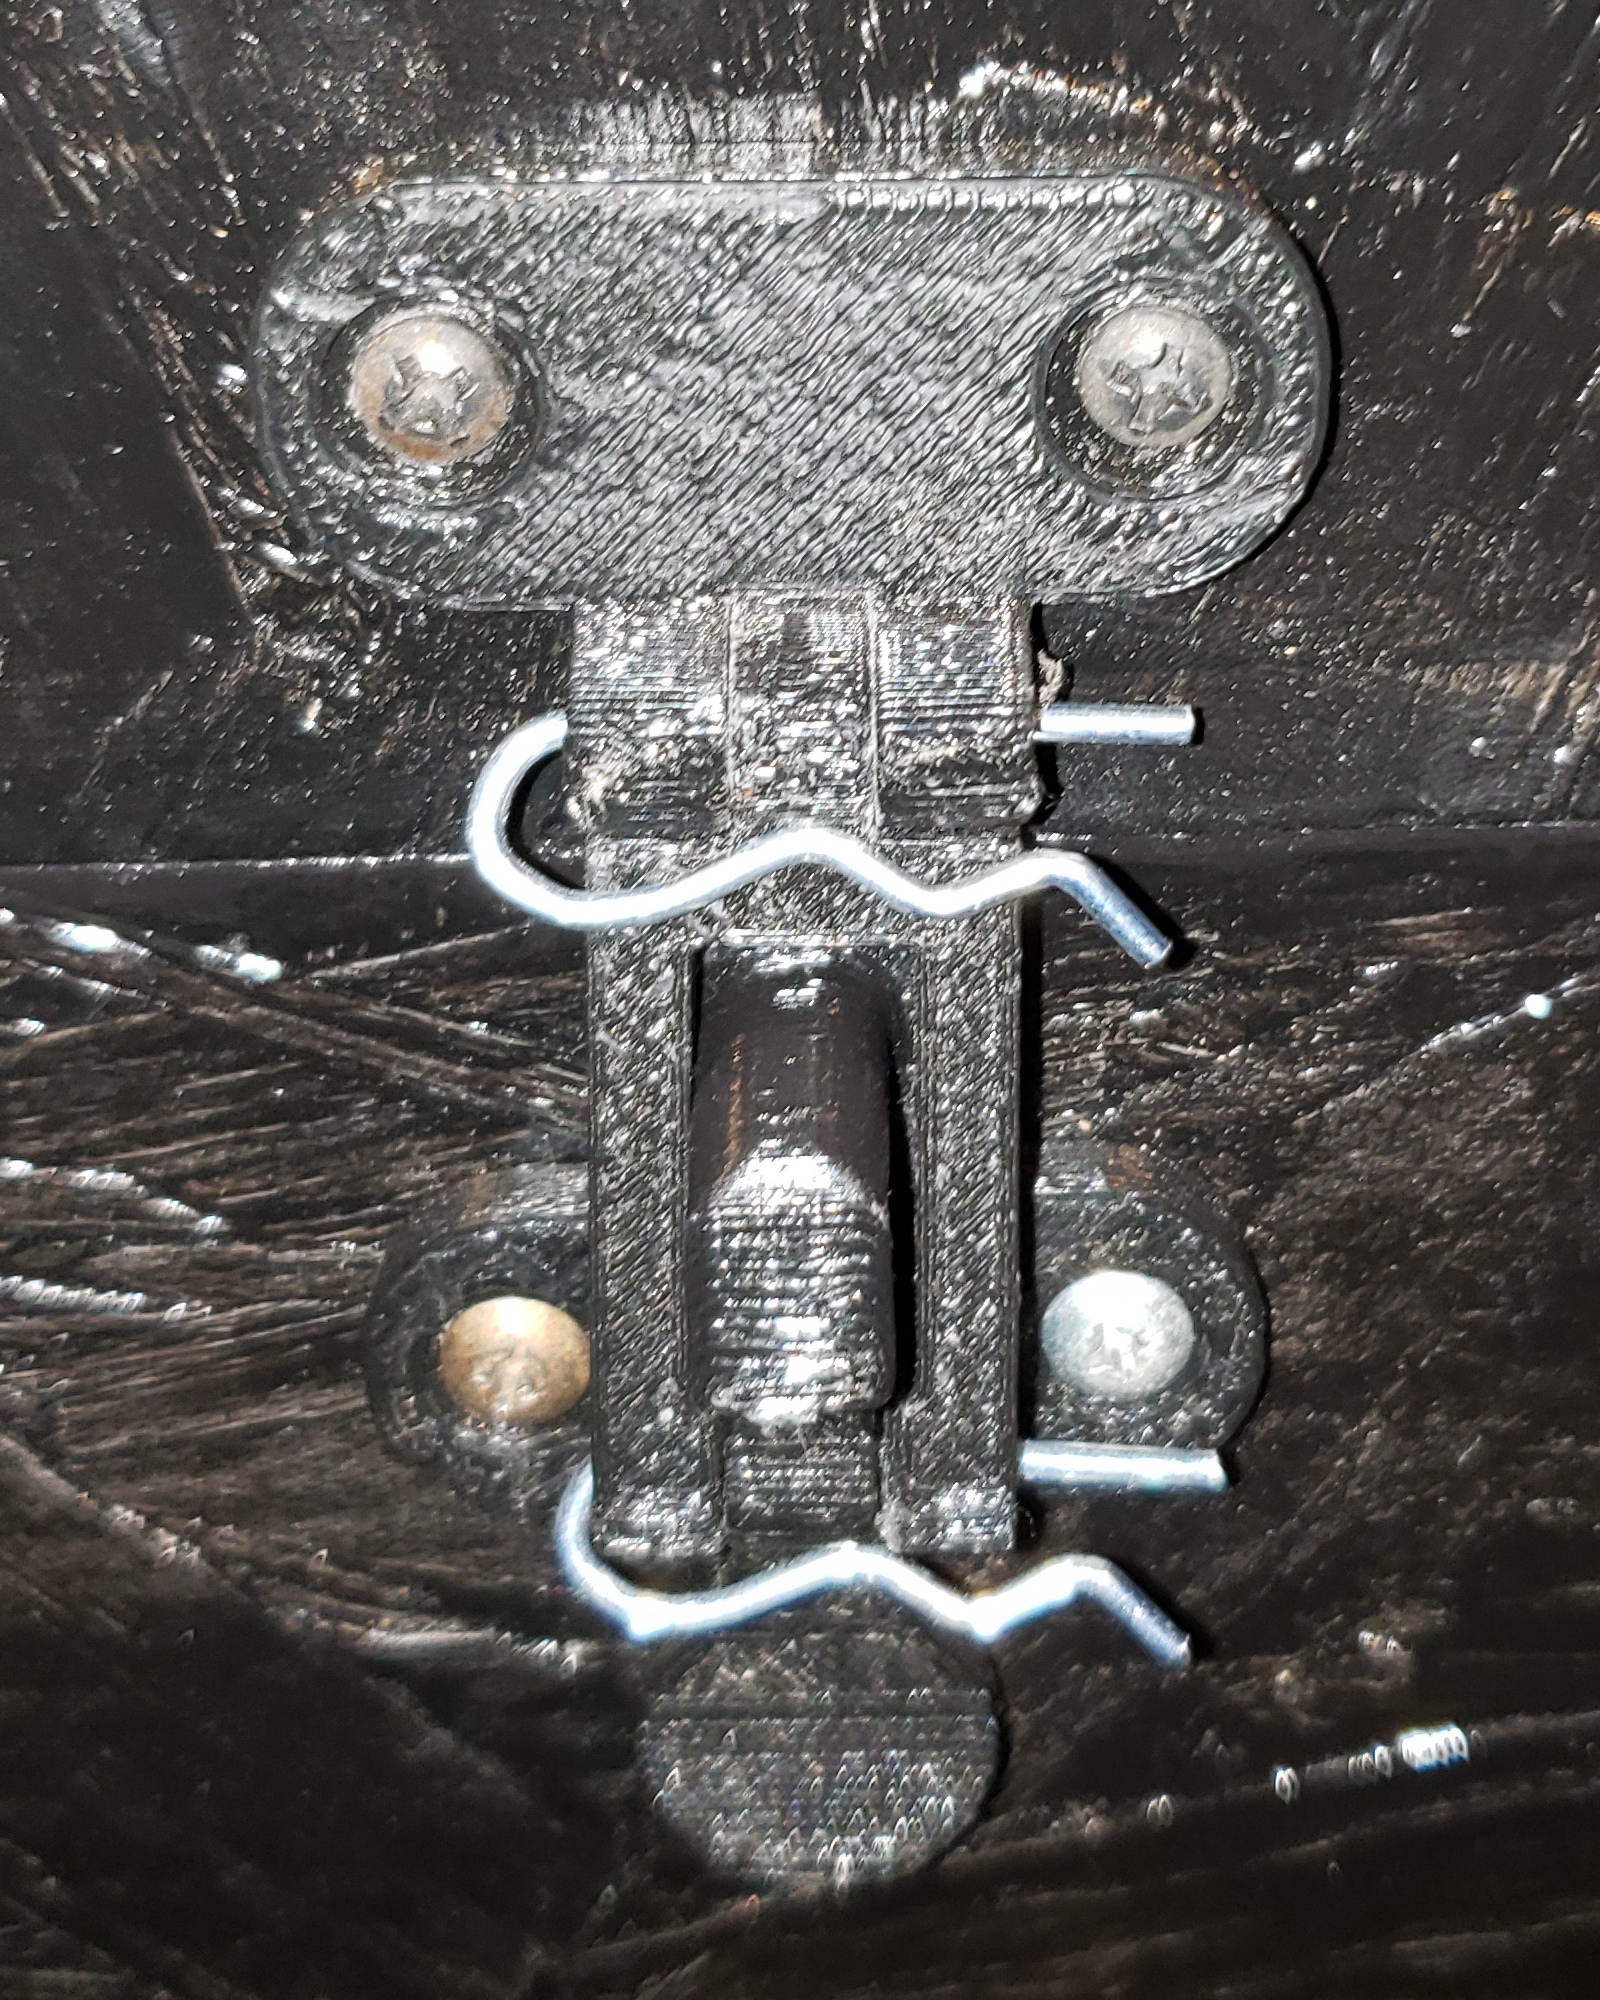
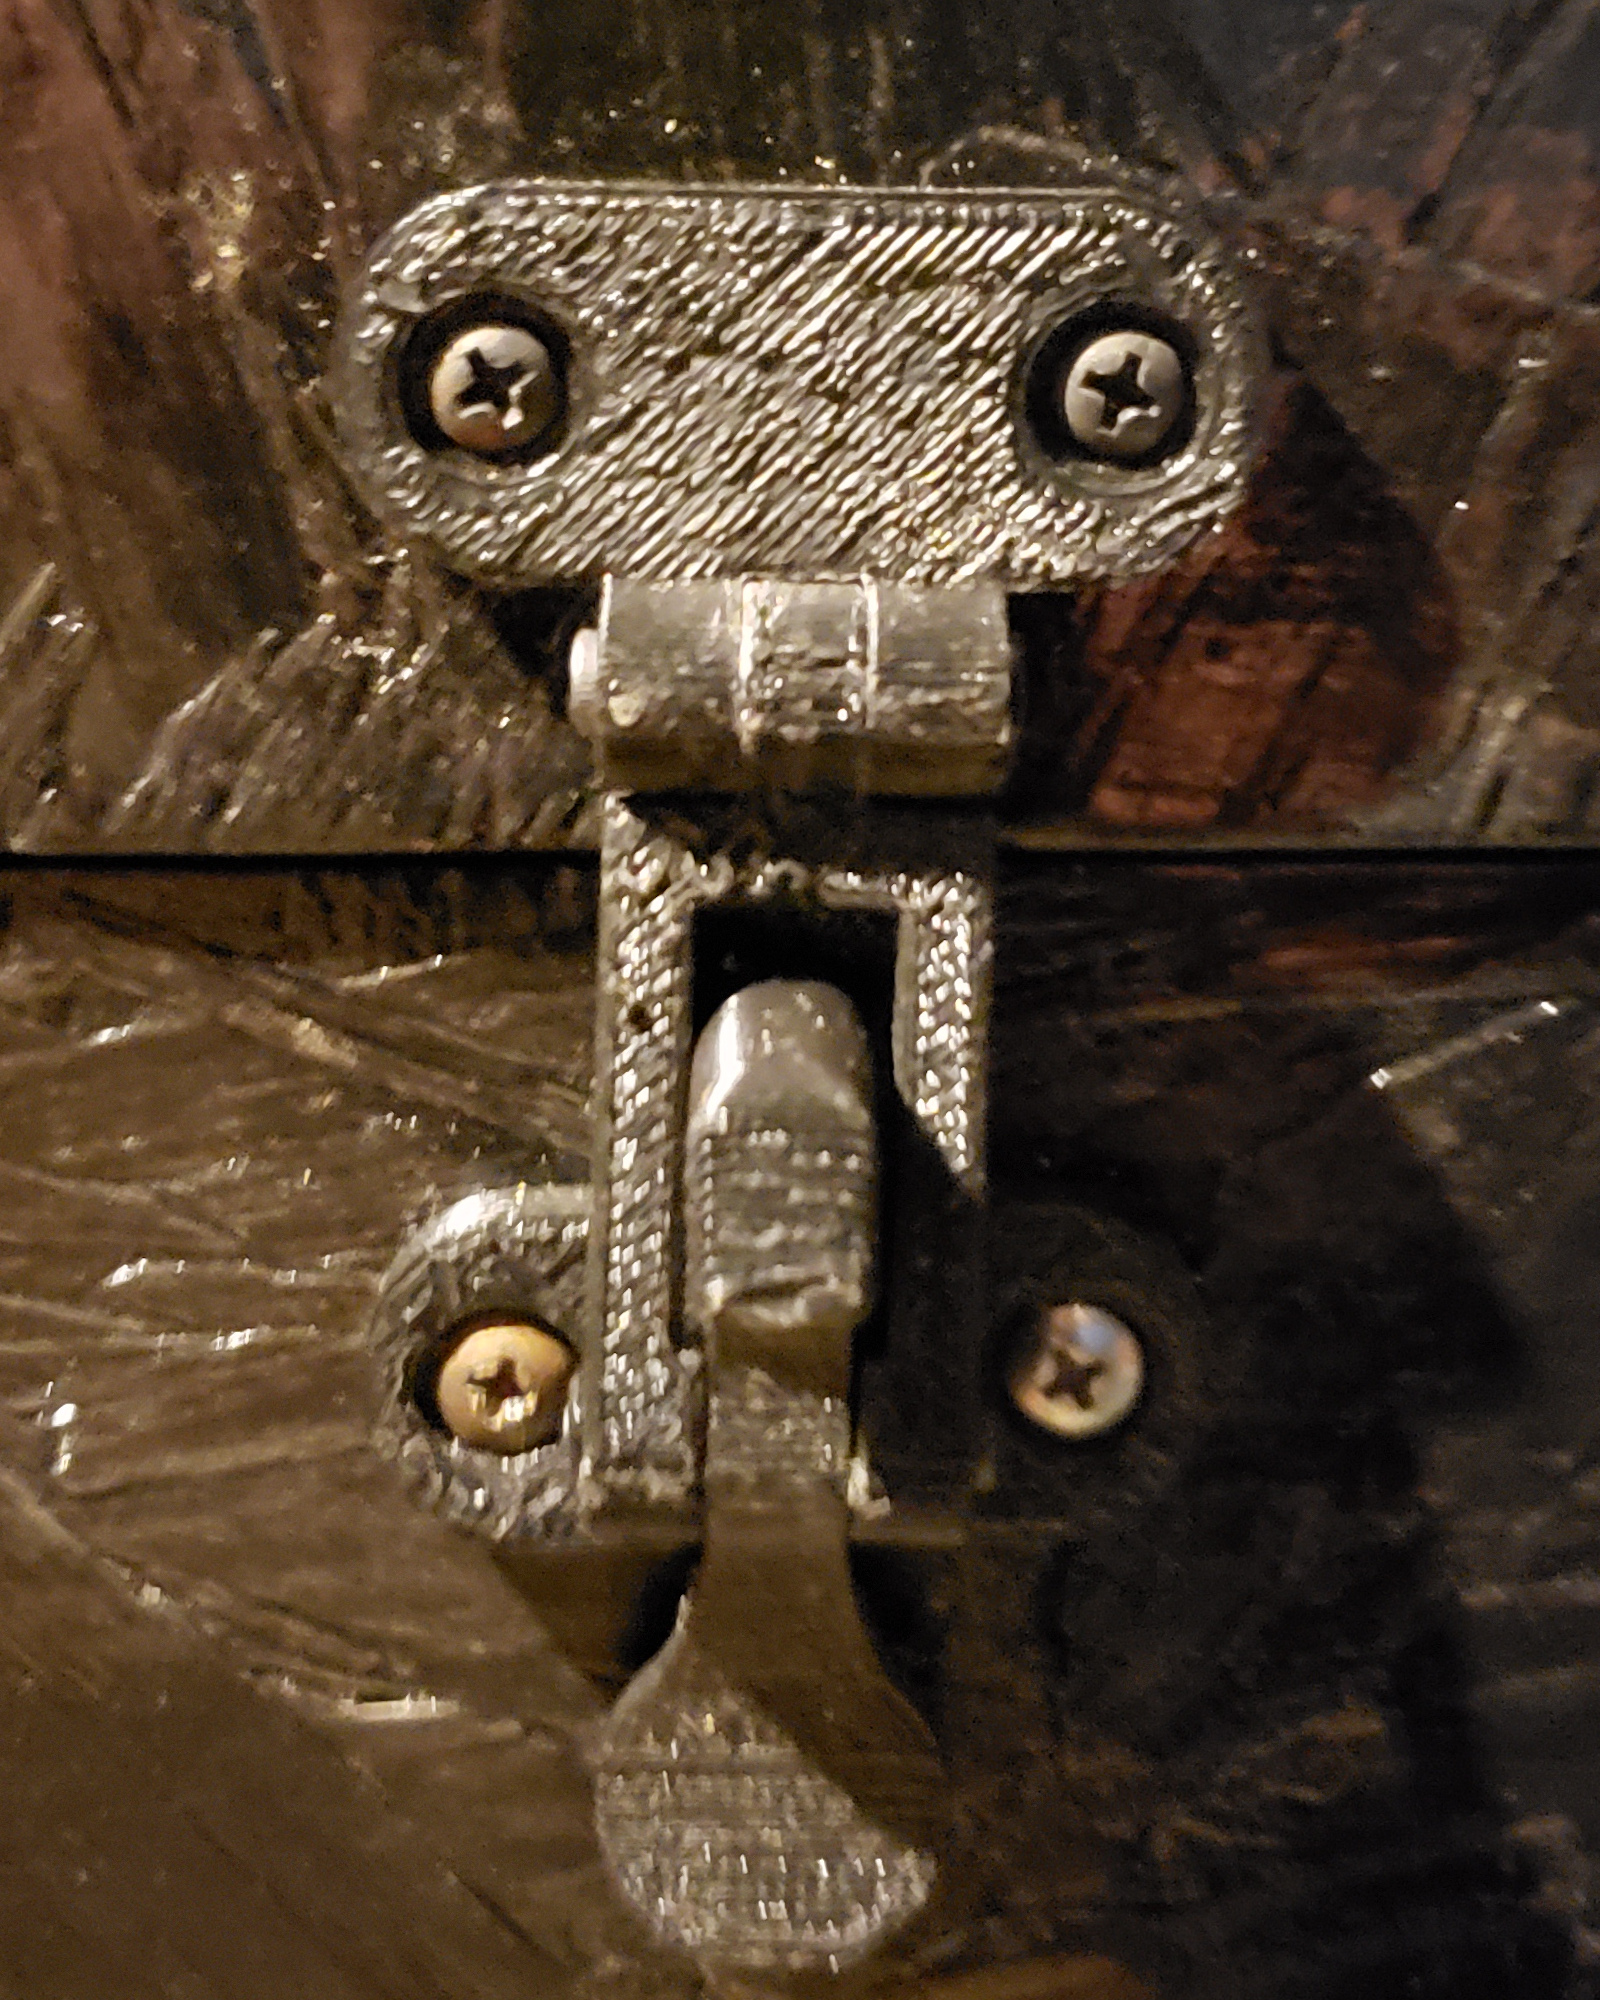
Latch
I started with this cam latch
which I wasn’t able to get to print and move. Next I found
this lockable latch which worked
without any modification. I didn’t have metric bolts sitting around, so it’s
currently held together with hitch pins. It’s not the prettiest look and I may
change it as some point. I ordered some metric bolts, see the second pic.
Chain and Anchor
A chain and anchors are used to hold open the bottom lid. I made this after a friend (remember Greg from the camp story in the first paragraph?) guilted me in to really 3D printing as much hardware as I could.
As this point we “rediscovered” a 3D printer at work (da Vinci 2.0 Duo) and I was asked to see if I could get it printing again. If I thought that the MakerBot Replicator 2 had been hamstrung by proprietary software, this thing from XYZ Printing seems to have had a total amputation of its legs. Chipped filament, terrible proprietary software, and an overflowing dumpster of incompatible versions / bundles to choose from at that.
From a hardware perspective it had an extruder that wouldn’t heat because they used a SMD resistor as a fuse and it had “blown.” I stole power from the bed and called it a day. Also from a hardware perspective the printer is an Arduino, meaning some great open-source firmware exists for it. I flashed that and now have a working printer.
For all my complaining about proprietary software, I was still designing in Fusion 360: A program which won’t even let you view a design unless you’re connected to the internet and it can phone home. I decided to learn to use FreeCAD to design these parts.
The design experience was excellent, FreeCAD is a great piece of software. The printing experience had a bit of a learning curve as I was now using ABS, a new printer, and was printing small parts. The end result looks cool, but I may swap it out for an articulated arm. The chain flexes a little more than I’m comfortable with.
Update: Lid Arms
I ended up designing folding arms that could be attached to the side. They work great with just enough flex to make up for imperfections while still making the lid a much more usable workspace.
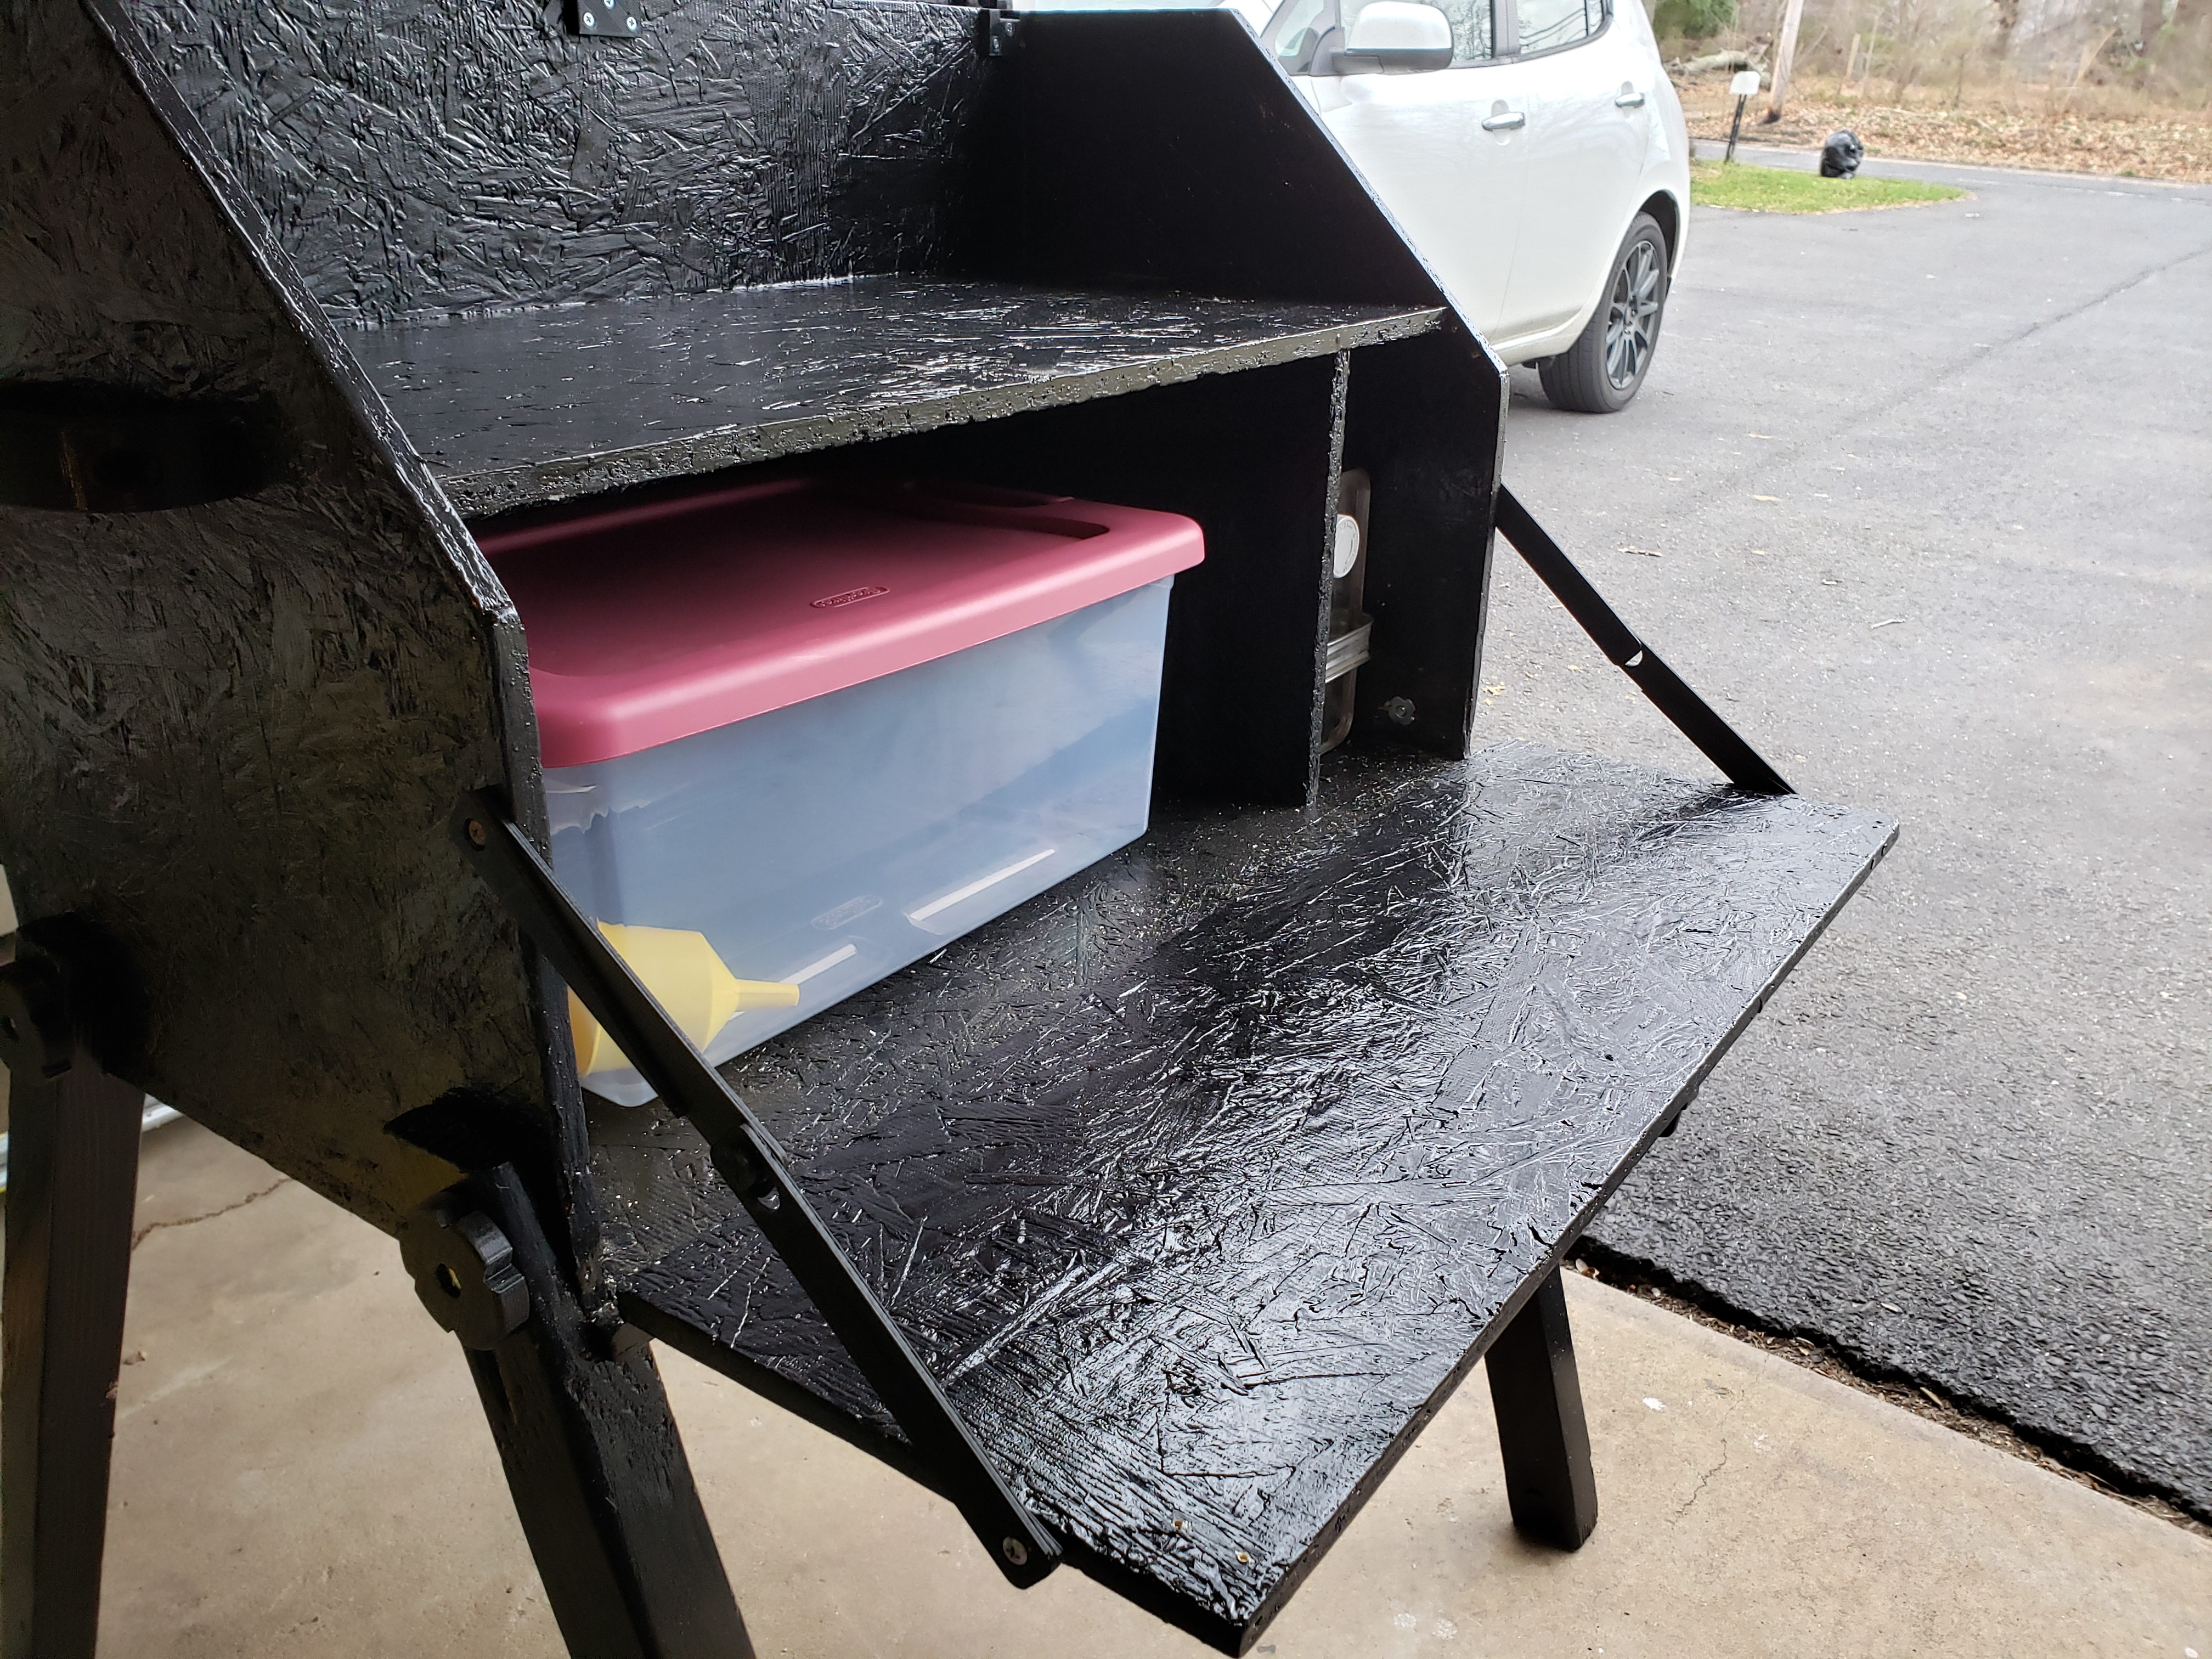
It also gave me the opportunity to use the A2Plus addon in FreeCAD to test the assembly and make the demo you see above. The STL/FreeCAD files for each part of the arms can be found here:
- Right Arm Top (STL|FCStd)
- Right Arm Bottom (STL|FCStd)
- Left Arm Top (STL|FCStd)
- Left Arm Bottom (STL|FCStd)
Bolt Knob
This is by far my favorite part in the whole build. I ended up making some legs out of 2x4 scraps that I had lying around. Originally I had planned on holding them in with a bolt and a t-nut. While contemplating how I should pack a wrench to tighten the bolt, I realized that what I really needed was something that was easy to hand tighten. In a half hour I made a part in FreeCAD. The next day I printed it with tolerances just tight enough to keep the bolt from falling out. The print turned out great as it was the first medium sized, flat bottomed, non-articulating print since the handle. This part saved me carrying / eventually losing four washers and a wrench.
Conclusion
I can see the appeal of wanting to be able to make just about anything out of of plastic. That being said, 3D printing comes with its own heavy baggage of domain specific knowledge and quirky software. You can also make just about anything with a block of wood, a chisel, and wood working expertise. The difference with 3D printing is that once the design work is done, it’s really easy to make your own copy. I’d argue that 3D printing doesn’t just facilitate sharing, it creates an environment that demands it. I hope that you can use some of these ideas / designs.